
Easy.Jobs ist eine All-in-one-Einstellungslösung für Erstellen Sie eine neue Stellenanzeige, verwalten Sie laufende Jobkampagnen, stellen Sie die richtigen Talente ein und vieles mehr. Mit dieser beeindruckenden Plattform können Sie ganz einfach eine neue Stellenausschreibung erstellen und Ihren Einstellungsprozess optimieren.
Wie erstelle ich eine neue Stellenanzeige in Easy.Jobs? #
In der folgenden Richtlinie erfahren Sie, wie Sie in Easy.Jobs eine neue Stellenanzeige erstellen:
Schritt 1: Melden Sie sich bei Ihrem easy.jobs-Konto an und oStift dein Instrumententafel.
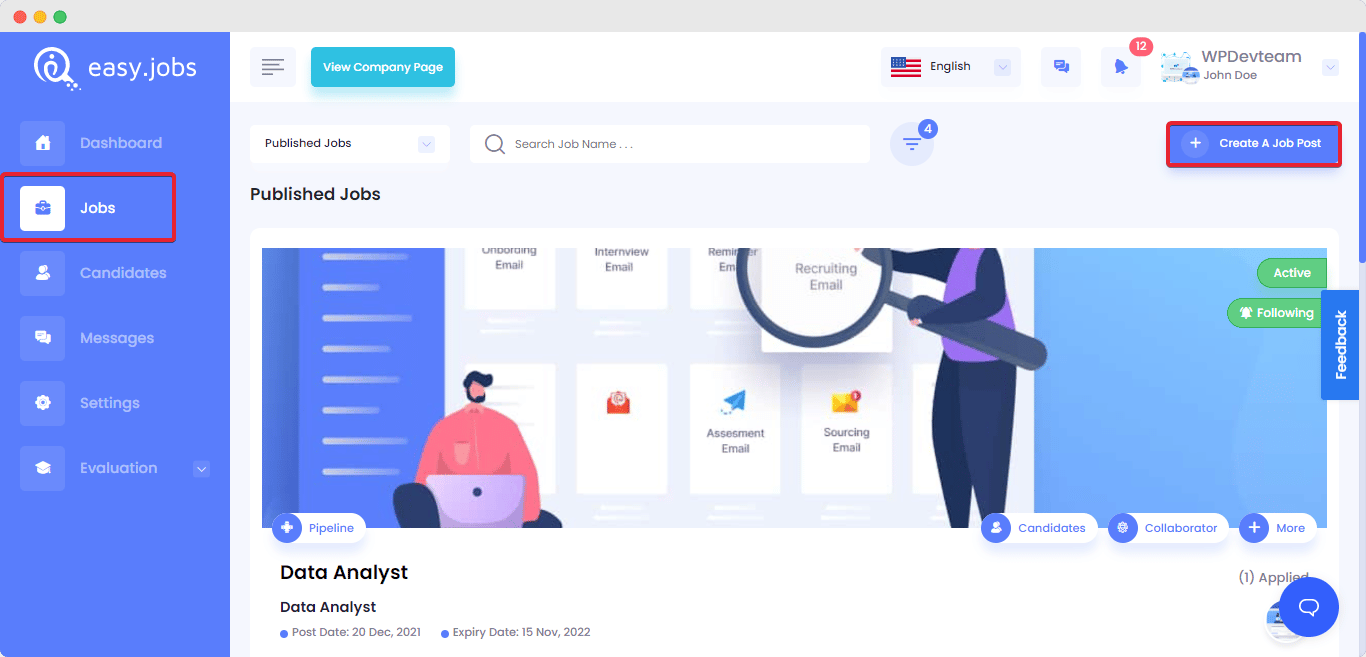
Schritt 2: Klicke auf 'Arbeitsplätze' Von der linken Seitenleiste aus gelangen Sie zu dieser Ansicht unten.
Schritt 3: Um einen neuen Job zu erstellen, klicken Sie auf die Schaltfläche „„Eine Stellenanzeige erstellen“ Schaltfläche von der oberen rechten Ecke.
Schritt 4: Sie können eine neue Stellenanzeige entweder mit vorgefertigten Stellenbeschreibungsvorlagen erstellen oder diese manuell hinzufügen. Wenn Sie eine Stellenanzeige mit vorgefertigten Vorlagen erstellen möchten, klicken Sie auf das „Wählen Sie eine Vorlage aus“ Klicken Sie auf die Schaltfläche und wählen Sie Ihr bevorzugtes aus. Da ist auch ein Standardvorlage für Stellenbeschreibungen, mit dem Sie beliebige allgemeine Stellenausschreibungen erstellen können. Schauen Sie sich das vollständige Verfahren an Hier.

Wenn Sie manuell eine neue Stellenanzeige erstellen möchten, geben Sie Stelleninformationen wie „Stelle“ ein Titel, Jobdetails, Kategorieund alle notwendigen Informationen, die Sie in der Stellenausschreibung anzeigen möchten, in den angegebenen Feldern. Vergessen Sie nicht, alle erforderlichen Felder auszufüllen. Darüber hinaus können Sie nach rechts wechseln, um die Vorteile des Unternehmens in Ihrer Stellenanzeige hervorzuheben „Unternehmensvorteil anzeigen“ Abschnitt.

Easy.Jobs bietet integrierte Banner für Stellenausschreibungen. Wenn Sie sie ausblenden möchten, aktivieren Sie den Ausblendmodus. Sie können das Cover-Banner der Stellenanzeige auch ändern, indem Sie auf klicken „Bannerbild aktualisieren“ Taste. Wenn Sie alle Informationen ausgefüllt haben, klicken Sie auf „Speichern und fortfahren' Knopf unter.

Schritt 5: Es wird dich zum bringen „Screening-Frage“ Sicht. In Easy.Jobs müssen Sie zunächst die Auswahlfrage erstellen Bewertung –> Fragensatz, Finden Sie die vollständige Anleitung heraus Hier. Dann stehen Ihnen alle Screening-Fragensätze zur Verfügung. Von dort aus können Sie Ihren vorgefertigten Fragensatz hinzufügen oder alle Fragen einzeln erstellen.

Sie können auch das ankreuzen Erforderlich Aktivieren Sie das Kontrollkästchen der Fragen, um die Beantwortung dieser Fragen für jeden Kandidaten verpflichtend zu machen. Nachdem Sie den Fragensatz zur Stellenanzeige hinzugefügt haben, wählen Sie „Auswahl“. Zeitdauer und Markierungen und fügen Sie sie in die entsprechenden Felder ein. Klicken Sie dann auf „Speichern und fortfahren' Taste.
* Wenn Sie die Stellenausschreibung von einer anderen duplizieren, können Sie die zuvor hinzugefügten Auswahlfragen problemlos entfernen und aktualisieren. Anweisungen finden Sie hier dieser Dokumentation.

Schritt 6: Es wird dich zum 'Quiz' anzeigen und von hier aus können Sie die vorgefertigten auswählen Quiz Geben Sie Fragen für die neue Stellenausschreibung ein oder erstellen Sie sie einzeln manuell. Sie können Ihre Quizfragen auch organisieren, indem Sie sie mit nach oben oder unten verschieben „Nach oben bewegen“ & 'Sich abwärts bewegen' Tasten. Nachdem Sie alle Änderungen vorgenommen haben, drücke den 'Speichern und fortfahren' Taste.
* Wenn Sie die Stellenausschreibung von einer anderen duplizieren, können Sie die zuvor hinzugefügten Auswahlfragen problemlos entfernen und aktualisieren. Anweisungen finden Sie hier dieser Dokumentation.

Schritt 7: Legen Sie vor der Veröffentlichung Ihrer neu erstellten Stellenanzeige fest, welche Informationsanforderungen Sie von den Kandidaten einholen möchten. Klicken Sie dazu auf „Felder anpassen“ und überprüfen Sie die erforderlichen Felder. Klicken Sie dann auf 'Speichern fortsetzen' Taste.

Endergebnis #
Um zu sehen, wie Ihre Stellenanzeige live aussehen wird, klicken Sie auf 'Vorschau' Taste. Wenn Sie mit dem endgültigen Aussehen zufrieden sind, klicken Sie auf „„Speichern und veröffentlichen“ Taste. Glückwunsch! Sie haben eine neue Stellenausschreibung für Ihr Unternehmen erstellt.

So einfach können Sie eine Stellenanzeige erstellen Easy.Jobs Einstellungslösung.
Wenn Sie Hilfe benötigen, wenden Sie sich bitte an kontaktiere uns oder mach mit bei uns Facebook-Community um mit anderen Firmeninhabern wie Ihnen in Kontakt zu treten.


